Portal Home > Knowledgebase > Modem Setups > How to setup ADSL on a Netgear router/modem
Before you begin
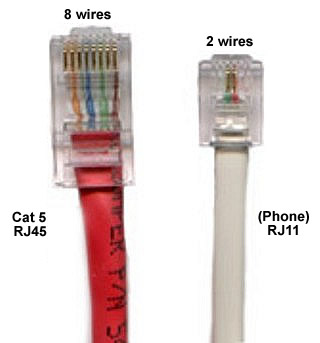
Please ensure that your modem/router is connected to your telephone line by a telephone cable and your computer is connected to your modem/router with a LAN cable. The difference between a telephone cable and a LAN cable can be seen here. Also, you need to connect your router to it's power supply and it's power supply to a free two-prong socket.STEP 1: Log into the router from your computer
You will need to have a working network card or port with a computer attached in order to connect to the ADSL router. These instructions assume the default router setup, if they do not work, call us your IT support person. This guide assumes that you have set up all the physical connections as per the instruction sheet found inside the box.
- Open a browser (Internet Explorer, Mozilla Firefox etc.) and type http://192.168.0.1 in the address bar
- The browser should ask you for username and password, use username: admin and password: 1234 or password (these are the default for Netgear routers, refer to your manual if they don't work)
STEP 2: Configure the basic settings
- On the blue menu on the left, click on Basic Settings.
- Fill in the following settings:
- Does your internet connection require a login: YES
- Encapsulation: PPPoE
- Login: Enter the username you've received from us.
- Password: Enter the password you've received from us
- --Leave all other settings as per default--
- Click apply to save all the settings.
- Click test to have the router perform a quick diagnostic check. (If any of these tests fail you may need to contact us to try and figure out what the problem is)
STEP 3: Configure the ADSL settings
- On the blue menu on the left, click on ADSL Settings.
- Fill in the following settings:
- Multiplexing method: LLC-based
- VPI: 8
- VCI: 35
- DSL mode: ADSL2+
- Click Apply to save all the settings.
STEP 4: Configure Wireless settings (if needed)
- Click on Wireless settings.
- Configure the following under Wireless Network
- Name (SSID): Specify whatever you want, you'll use this to recognize the router on your wireless connections
- Region: Africa
- --Leave the other 2 settings are per default--
- Under "Wireless Access Point", check the first 2 boxes; Enable Wireless Access Point and Allow broadcast name
- --In future use "Setup Access List" to enter your pc's mac address if you have access problems
- Under "Security Options" check WEP and menu will open up - "WEP security encryption".
- Enter in any passphrase to generate a few keys. Select one, write it down, and click apply. You will have to enter this key on your computer under wireless connections in order to connect.>
STEP 5: Check to see if you're connected
- On the left navigation, click on "Router Status" under maintainence
- 2 quick checks to see if you're successfully connected:
- Below "ADSL port" you will have been assigned an IP address.
- Next to "modem status" it will say connected.

 Add to Favourites
  Print this Article
Powered by WHMCompleteSolution


